Update : OnePlus 5
Updated : Including OnePlus 3T
OnePlus Series Mega UNBRICK Guide + TWRP Flashing
Let’s rescue/unbrick our OnePlus One, 2 and 3 series, including OnePlus X, from any brick you may think of. Not very long, about 1.5 years ago, everyone was afraid of Qualcomm HS-USB Qdloader 9008 brick situations like death, because many didnt knew what that was, as a port. This is Qualcomm’s so called “service” port that we use to fix our phones with a proper ROM. This port can be manualy opened, or if you do something wrong like deleting your phone’s boot partitions accidently, sbl1.mbn for example, that port opens itself and waits you to flash with right Qualcomm flasher software, in the right way, with the right kind of ROM.
As someone who has been working on these “brick” cases since the past 2 years, I sometimes willingly brick a phone to death first, then unbrick it again, this takes less time in many brands, like today’s example, OnePlus series.
OnePlus is a “developer” phone in the first place. What does that mean ? This means your bootloader can be unlocked with a simple fastboot command and you are ready to “develop” ROMs or apps. This means OnePlus won’t be out of warrantee if you “root” it, as rooting and unlocking the bootloader freely are a part of being a developer phone. Thanks to OPPO, yes you read right– OnePlus One was an identical twin of the Oppo Find 7 series from inside, we are able to find “unbrick” roms of these developers phones since a while. Oppo Find 5 was the first model as an example of this story. Actually I am the first one in the world who has unbricked OnePlus One from a death brick ( i like to call this a coma brick ), from Qualcomm HS-USB Diagnostics 9006. My two articles “Snapdragon’s are UNBRICKABLE” has been read by 450,000 readers around the world in a year. It’s time to share my experiences with our readers at androidbrick.com.
Rescue Files :
Qualcomm Driver :
STEP 1:
Before we start, we need to put our Windows operating system into “Test Mode”, so we dont have to deal with any driver install issues in between our work.
To do this just :
Press Start->Search->cmd then right-click on it and click Run as administrator. In the CMD window type or copy this “Bcdedit.exe -set TESTSIGNING ON” and press enter.
Restart PC.
After your work with unbricking is done, if you want to get out of this test mode, detailed instructions are here : Windows Test Mode .
This is pure unbricking method with its own flasher inside the rescue folders so we dont need any adb or fastboot command to get in EDL (Qualcomm HS-USB Qdloader 9008) mode like we did in our Xiaomi guide before. We will use a simple key combination like I described in our Lenovo/ZUK guide. Special thanks to OnePlus for not hiding it from us, like Xiaomi did.
OnePlus’s own flashers : MsmDownloadTool V3.0 is for OnePlus 3, MSM8994DownloadTool is for OnePlus 2, MsmDownloadTool V2.0 is for OnePlus X and Msm8974DownloadTool is for the OnePlus One. These tools will be in every rescue package that you will download from links above. I will be working on OnePlus One today. This model has Color OS 2.0 as rescue ROM, so after you flashed this rom your OPO will boot with Color OS (Chinese-English version), BUT whats important for us is to get back our “fastboot mode” back, its a developer phone remember?
After we have fastboot mode back we will be able to flash TWRP recovery to our phones and flash any rom that we want, including stock ROMs. Rescue packages for other models than the OnePlus One contain only rescue partitions in it, so no “system.img” and “userdata.img’s”. They will give you stock recovery and bootloader (fastboot). There are also complete rescue ROM files but because they are big packages, hard to upload them all to our servers, i will give those “androidfilehost” links under the article too. But if you are a “custom rom” guy like me, you wont need those stock ROMs, flashing TWRP will be more then enough to go to second step after rescue (flashing a custom ROM).
STEP 2:
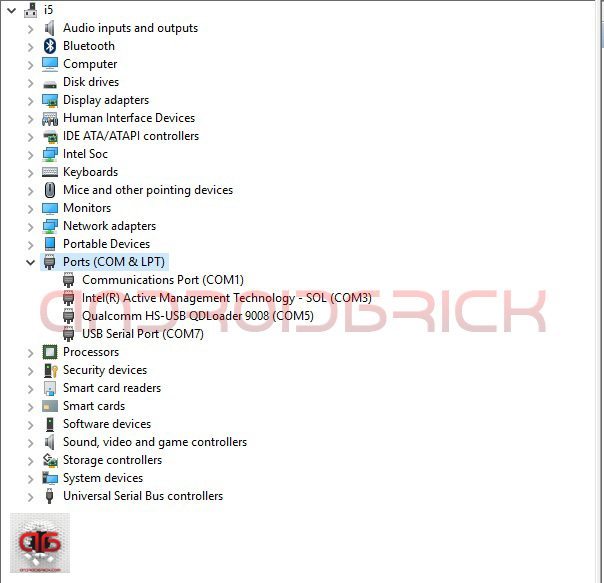
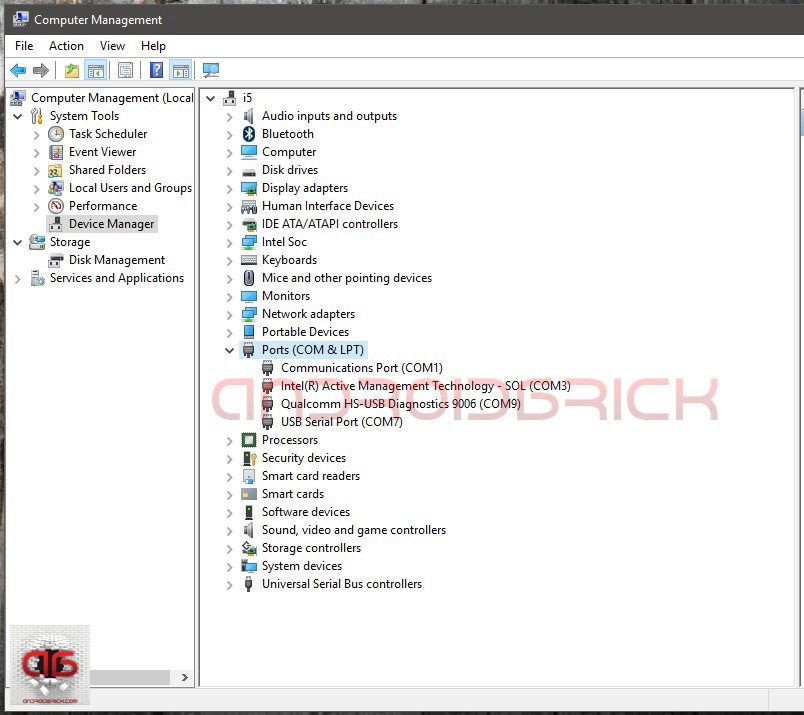
Let’s put our OnePlus’s into the Qualcomm HS-USB Qdloader 9008 /EDL mode. To do this, we will use the default key combination of Qualcomm for this : Phone is completely off> Press Volume “+” button> Plus the USB cable in (without pressing power button), thats all. Before that I presume that you have installed “Qualcomm QdLoader driver” on your system, if yes, your new device will be like in the picture, if not, please do it in this step and get ready for the next step.
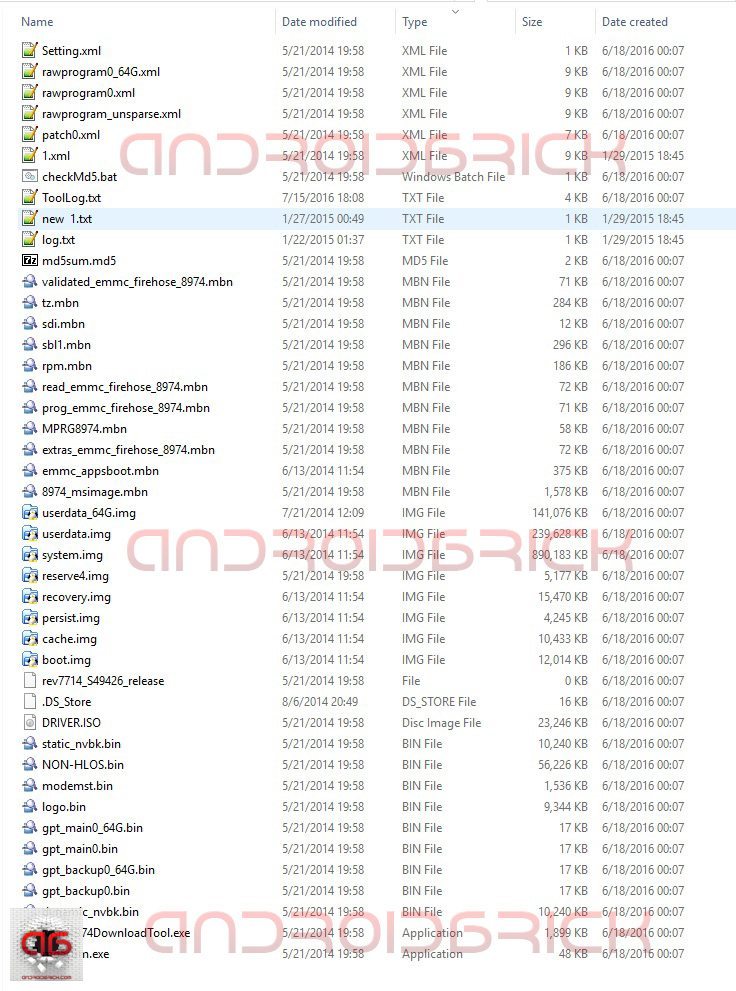
Our flasher will be “Msm8974DownloadTool.exe”, but I pictured here all the ROM folders, because I want you see some other files too and understand what we are doing here. “rawprogram0.xml”, “patch0.xml”, “prog_emmc_firehose_8974.mbn” and “MPRG8974.mbn”, these files are Qualcomm’s engineer files and cant be found in any rom than these kind of “service” roms. All the xml files can be regenerated but those mbn files not. They include vendor (maker) related model specific sign codes in it and cant be used on cross models. What I’m trying to explain here is — You have seen those files in your Xiaomi’s fastboot roms too, like in your Lenovo and ZUK’s Qfil ROMs, but like I said, you cant use Xiaomi Mi4’s “MPRG8974.mbn” to rescue an OnePlus One for example. They share same chipsets, Snapdragon 801’s but because of the different “signs” in them they just wont work, so dont loose time on this field. I know some users are..
STEP 3:
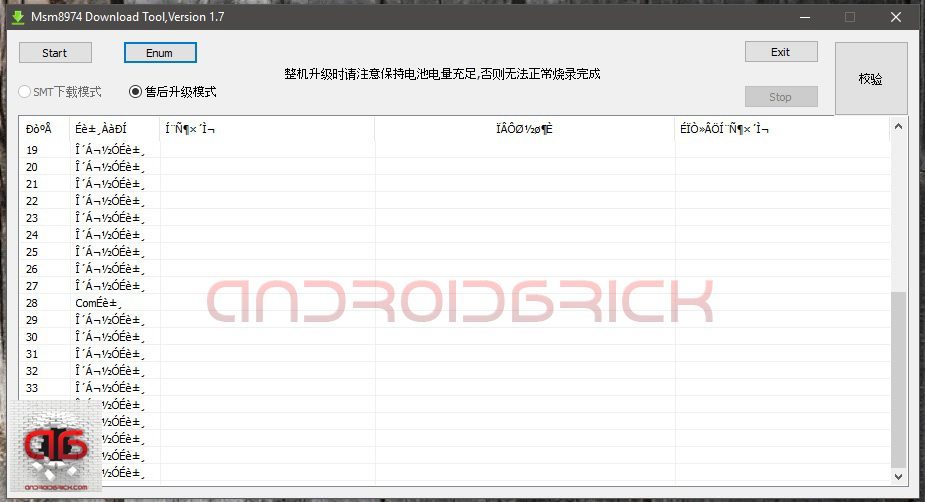
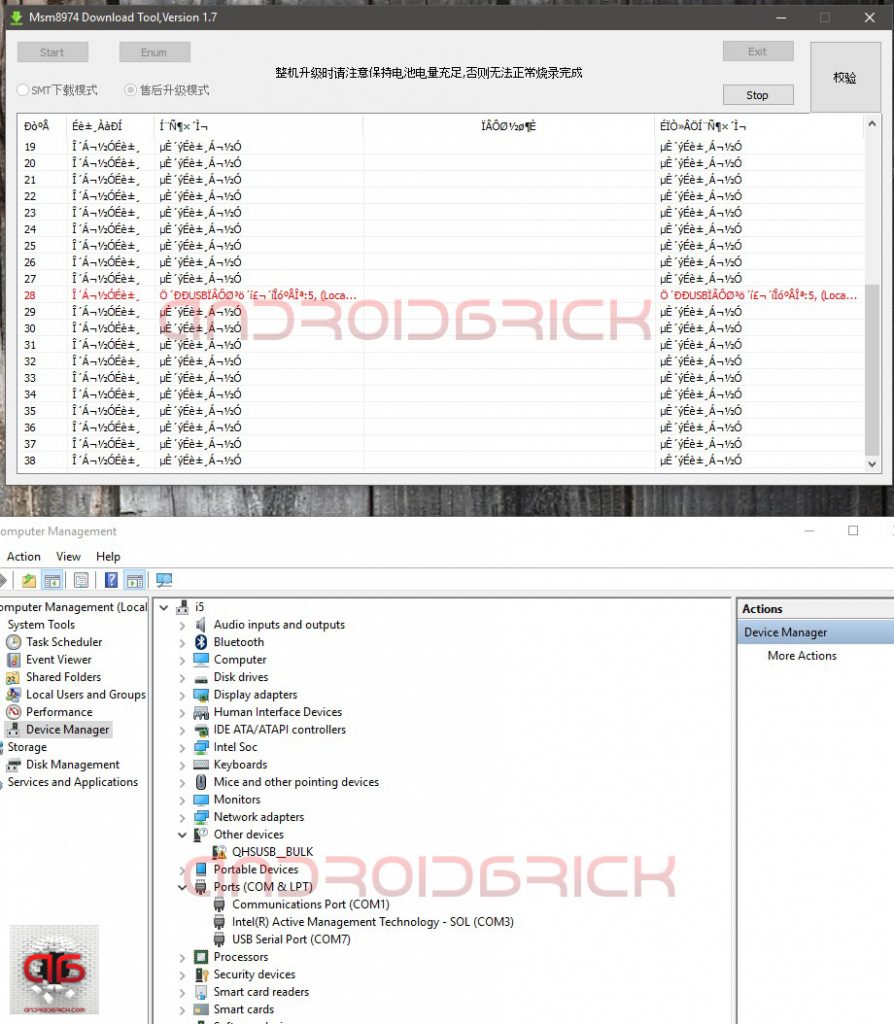
Right click “Msm8974DownloadTool.exe” and run it as “administrator”, this flasher is in Chinese but does not matter we will only use 2 buttons on it. “Enum” to identfy our EDL ports and then “Start” to start the flashing. Here my port is on Com 28, dont get confused Windows’s com port number and this tool’s numbers — same port, different numbers.
After you click on Start, “8974_msimage.mbn” will be send to your phone and you will hear an usb unplug and plug sound from your cumputers. If this is your first time you will see this :
An error on the Msm8974DownloadTool with red color (it says cant find the necessary port) and a new device under your device manager as “QHUSB_BULK”. Windows will automaticaly install drivers, just wait for a minute till you see your new port “Qualcomm HS-USB Diagnostics 9006”. This port will be used to flash the rest of the files, its so called “EMMC” mode of the Qualcomm device.
STEP 4:
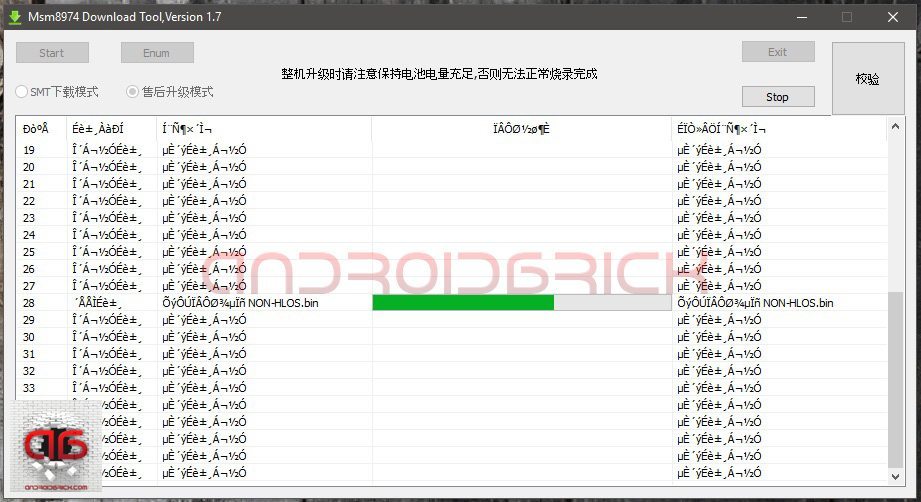
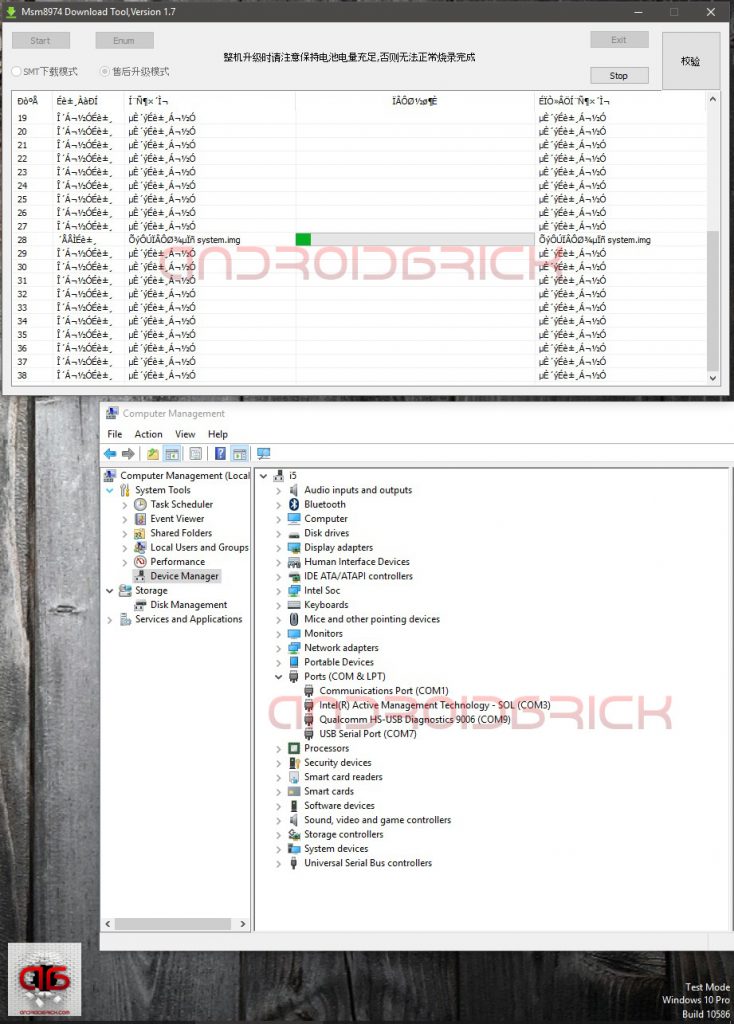
Lets close Msm8974DownloadTool first. Then press “power button” of the phone long enough while your are pressing Volume “+” button same time — this will reset Qualcomm 9006 port to 9008 again. Then, run Msm8974DownloadTool as administrator and click “Start” again. Because our 9006 driver is now installed and you will see this :
The tool will start to send rescue files to our bricked OnePlus’s. In this example, the whole Color OS 2.0 files including systemimg and userdata.img’s.
After it finishes youll see our port line will become green saying its done.
STEP 5:
Our last step will be to press our phone’s power button long enough till it vibrates and wakes up back to life again. Remember, just put your phones in “fastboot” mode pressing Volume “+” button while powering on. Then download our “OnePLus Latest TWRP Recovery Package for all Models”.
Copy your OnePlus model’s TWRP.img to your “fastboot.exe” working folder and type:
“fastboot flash recovery twrp-3.0.2-0-oneplus1.img” for OnePlus One
“fastboot flash recovery twrp-3.0.2-2-oneplus2.img” for OnePlus 2
“fastboot flash recovery twrp-3.0.2-0-oneplus3.img” for OnePlus 3 and
“fastboot flash recovery twrp-3.0.2-0-oneplusX.img” for OnePlus X of yours.
To boot into TWRP right away type :
“fastboot boot twrp-3.0.2-0-oneplus1.img” for OnePlus One
“fastboot boot twrp-3.0.2-2-oneplus2.img” for OnePlus 2
“fastboot boot twrp-3.0.2-0-oneplus3.img” for OnePlus 3 and
“fastboot boot twrp-3.0.2-0-oneplusX.img” for OnePlus X
Your OnePlus will boot to TWRP recovery, just copy your desired stock or custom ROM from your PC to your phone and flash it. That’s all folks 🙂
Here are links of complete rescue Roms like I promised :
OnePlus X Complete Rom Rescue Package
OnePlus 2 OxygenOS 2.1.1 Rescue Package
OnePlus 3 Complete Rom Rescue Package
UPDATE : OnePlus 5 files
Copyright © 2016 by androidbrick.com. All rights reserved.


